
Are you planning on building a campfire this weekend? If so, there are many ways to do it. In fact, I’ve only ever seen six different ways to build a fire! In this article, we’ll discuss each type of fire lay and how to use them. We’ll also talk about why some people build fires differently than others.
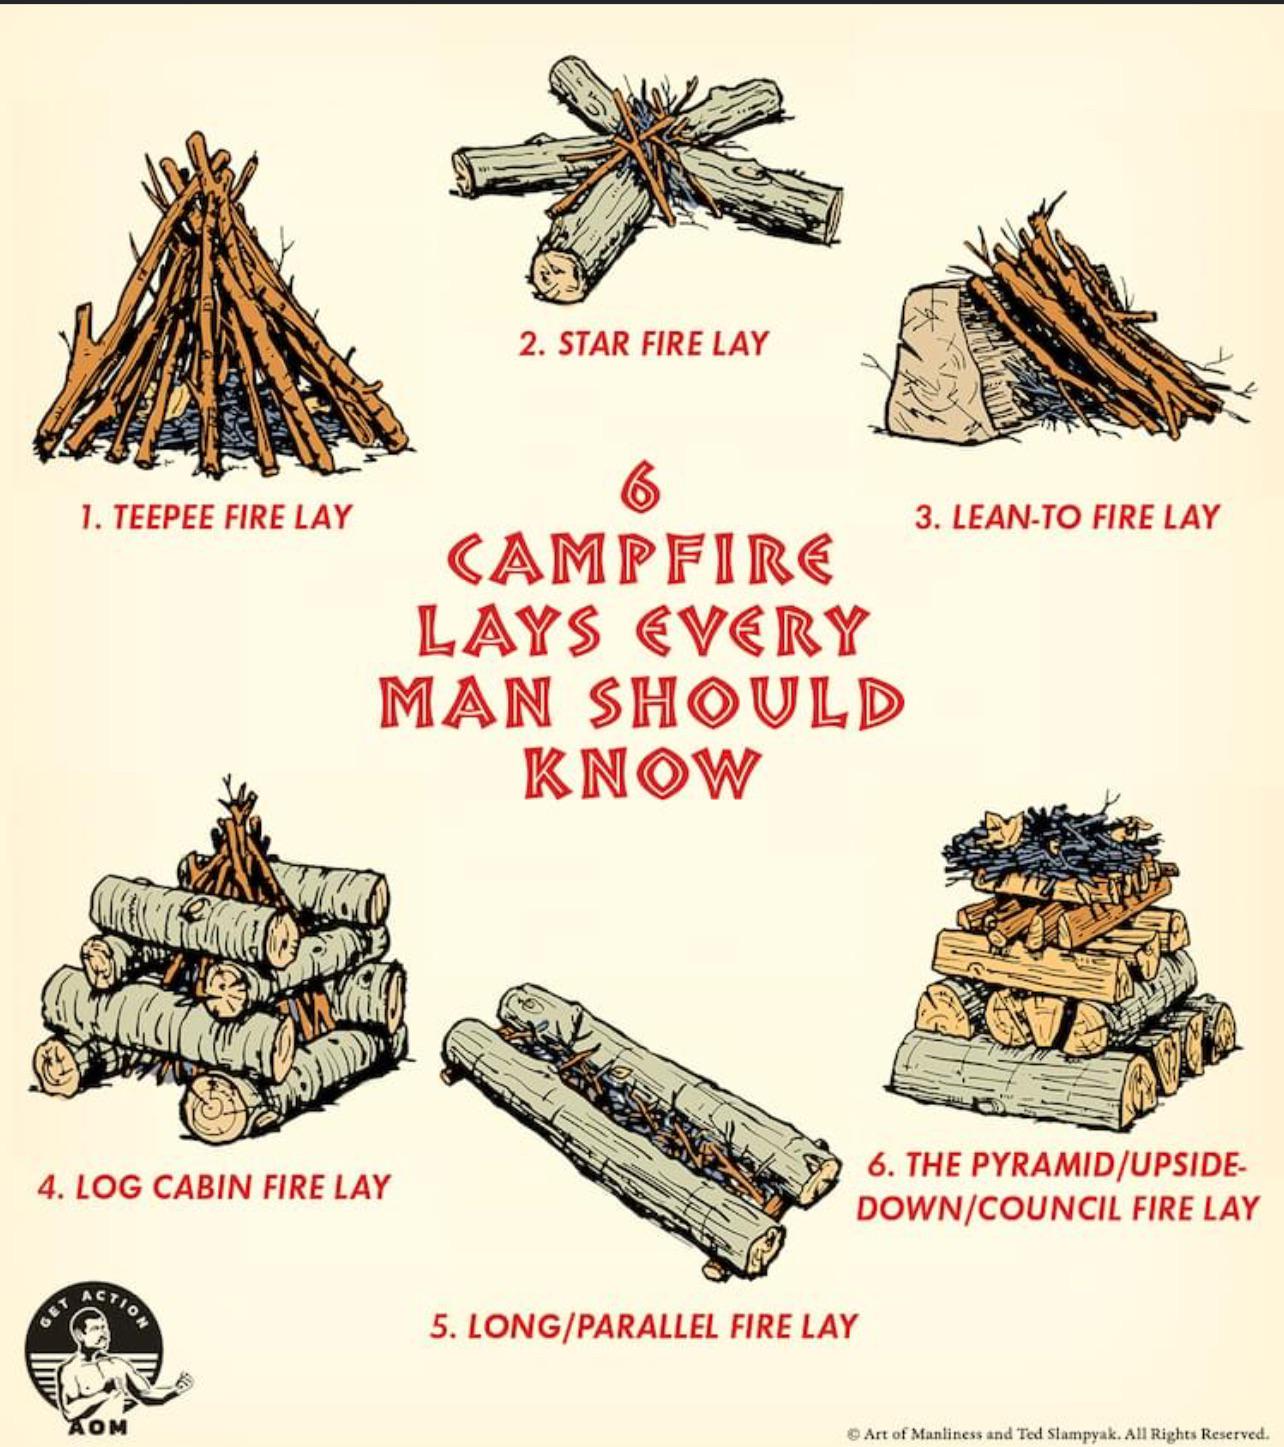
Teepee Fire Lay
The teepee fire lay is a simple way to get your fire going in no time. The idea behind it is pretty straightforward: you just place small pieces of wood on top of each other, building them up into a teepee shape. You want to make sure that all the wood you use is dry and ready for burning–if not, it won’t catch at all! To start off the actual process, use some kind of fire starter (like newspaper or dried grass) as kindling under your pile; this will help get things started without having to wait too long before adding larger pieces like logs later on. Once everything starts burning well enough that there are flames coming out from underneath all sides, feel free to add more fuel as needed until they reach their full height–but remember not overdo it because this can cause problems later down the road when trying
Star Fire Lay
The star fire lay is the name for a specific way to lay out your wood in a fire. It looks like an asterisk (*) and can be used for cooking, heating, or just warmth. The star fire lay is best used when you need a small but intense fire that will last longer than other methods of burning. This type of campfire will give off more heat than other types because it burns all sides at once instead of just one side at a time like most other fires do. It also allows less air flow around the flames so they don’t go out as quickly either! To build this type of campfire, start by stacking two pieces vertically on opposite sides (like tall towers). Then add one piece across from each tower (forming four short walls). Finally add another two pieces vertically between these two new additions (forming five points). You should now have something that looks like this: *
Lean-To Fire Lay
The lean-to fire lay is the most basic way to build a campfire. It’s also known as a tipi fire lay or bone-in-the-hole. This method uses two logs that lean against each other at an angle and creates an inverted cone shape around them, which makes it easy to insert sticks into the ground around them without disturbing your existing structure. The advantage of this style is that it requires very little skill or effort, but you should use caution when adding new materials because they may fall into your fire pit and cause damage or injury (or even start another blaze). The biggest disadvantage of this style is its lack of stability; if any wind blows through the area where you’re building your campfire, there’s no guarantee that it won’t collapse onto itself completely! If you do decide on using this method for starting out with building fires then we recommend trying one out first before venturing out into nature just so that there aren’t any surprises along the way!
Log Cabin Fire Lay
The log cabin fire lay is a way of building a campfire that can also be used to make a campfire. The log cabin fire lay is great because it’s easy to do, and it looks nice in your campsite. If you are looking for an alternative method of starting your campfire, this might be right up your alley! The first step in building a log cabin fire lay is collecting some logs from around your campsite or backyard area. You’ll want at least two types of different-sized logs: one kind should be shorter than the other (the shorter ones will go on top). Next step? Start arranging them side by side into rows until they’re all stacked up high enough–this usually takes three rows per layer–and then cap off each row with another piece atop it so none fall out when stacking more layers below later on down the road during construction process!
Parallel Fire Lay
The Parallel Fire Lay is the easiest way to build a campfire. It’s also the most common, so you’re likely to see it in any campsite or backyard setting. The basic idea is that you lay down logs in parallel rows with enough space between them for air to flow through and help ignite your kindling (the smaller pieces of wood). Once everything has caught fire from the bottom up, you can add larger pieces of fuel until your fire is big enough for cooking purposes. If done properly, this method ensures even heating throughout so nothing burns too quickly or slowly–and because it uses all sides of each log as opposed to just one side (like when stacking logs vertically), there are fewer chances for air gaps that could cause problems later on down the road when trying to maintain control over temperature levels during cooking processes like boiling water overtop coals without burning off fingers in hot spots caused by poor management techniques used earlier during construction stages!
Council Fire Lay
For the best way to start a fire and maintain it, we recommend using the council fire lay. This method allows you to build multiple fires at once while still keeping them separate from each other. It also provides ample space for cooking and other activities around your campfire, as well as providing easy access to resources such as wood if needed. The first step in building a council fire is finding some flat ground where it won’t be disturbed by wind or rain–this will allow you to keep everything contained within one area so that it doesn’t spread out too far when burning down into ashes before being extinguished properly later on! Once found, clear out any debris from this area before laying down two logs parallel with each other along their long edges facing away from one another (make sure both ends have been cut off). Then put another layer on top by placing three more logs across those two parallel ones so that they rest snugly against them without falling over or moving around too much due to wind gusts nearby; finally close off this big rectangle shape created by adding four more logs around its perimeter so none escape through gaps between each side piece’s spaces left open during construction process earlier mentioned above which allows air flow inside container holding heat source safely away from combustible materials back there underneath matting surface below ground level where nothing else burns except maybe some kind of flower growing nearby.
We hope this article has helped you learn about the different ways to build a campfire. We know that it can be overwhelming when you first begin learning about building fires, but don’t worry! After reading this article and practicing with some of these methods, it will be second nature before long. Remember: if at first your fire doesn’t catch on right away (and believe us, sometimes even experienced outdoorsmen have trouble), just keep trying until something works out.